We offer private, customized training for 3 or more people at your site or online.
In the previous SharePoint tutorial (Part I), you created the In & Out Board and Employee Status lists. In Part II, we will build the custom workflow that will be used to update the Employee Status list. To perform these steps, you will need to know the location of the two lists created in the previous tutorial, and you will need SharePoint Designer 2013 to create the workflow.
Create the Update Employee Status Workflow
- To begin, open SharePoint Designer 2013 and then open the site that contains the In & Out Board and Employee Status lists.
- In SharePoint Designer 2013, in the Navigation pane (left side), click the Workflows node.
- In the Workflows tab in the ribbon, click the List Workflow button and select the IOBoard list from the dropdown.
- On the Create List Workflow – IOBoard dialog, provide these responses:
- Name: Update Employee Status Workflow
- Platform Type: SharePoint 2013 Workflow
- Click OK.
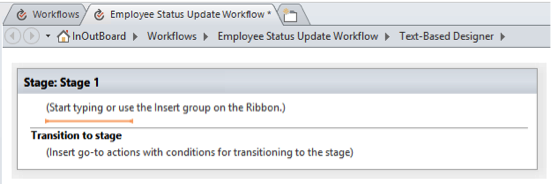
- The Text-based Designer should open, as shown below:
Create the Update or Insert, Create, and Update Stages
- Click the Stage 1 title and rename the stage to Update or Insert Status, then press ENTER.
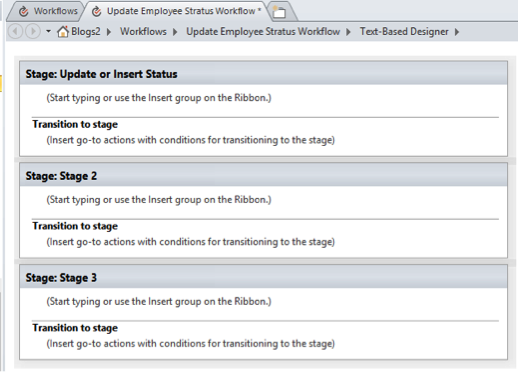
- Click below the Update or Insert Status stage and click the Stage button in the ribbon. Click the below the Stage 2 you just added and click the Stage button again. You should have three stages, as shown below:
- Click the Stage 2 title and rename the stage to Create, then press ENTER.
- Click the Stage 3 title and rename the stage to Update, then press ENTER.
Build out the Update or Status Stage
- Within the Update or Insert Status stage, in the Transition to Stage section of the stage, click under the “Insert go-to actions with conditions for transition to the stage” caption.

- In the Ribbon, click the Condition button and select the If Any Value Equals Value condition.
- Click the value link just to the right of the If and click the Fx button (workflow lookup).
- On the Define Workflow Lookup dialog:
- Select Employee Status for the Data Source.
- Select Employee Name for Field from Source.
- Down in the Find the List Item section:
- Select Employee Name for the Field.
- Click the Fx button to the right of the Value text box.
- On The Lookup for Person or Group dialog:
- Select Current Item for Data Source
- Select Employee Name for Field from Source
- Select Display Name for Return Field As.
- Click OK on the Lookup for Person or Group dialog
- Click OK on the Define Workflow Lookup dialog.
- Click Yes to the “The lookup that you defined…” dialog.
- Click the second Value link to the right of the equals text.
- In the Select User dialog, click Workflow Lookup for a User… option from Or select from existing Users and Groups: and click the Add>> button.
- On the Lookup for Person or Group dialog, make the following selections, then click OK:
- Current Item for Data Source
- Employee Name for Field from Source
- Display Name for Return Field As
- Click under the “Insert go-to actions with conditions for transitioning to the stage” caption between the If and the Else lines. Click the Action button in the ribbon and click Go to a stage.
- Click the a Stage link in the Go to a Stage action you inserted in the previous step. Select Update from the dropdown.
- Click under the “Insert go-to actions with conditions for transition to the stage” caption under the Else line. Click the Action button in the ribbon and click Go to a stage.
- Click the a Stage link in the Go to a Stage action you inserted in the previous step. Select Create from the dropdown.
Build out the CREATE stage
- In the Create stage, click under the (Start typing or user the Insert group on the Ribbon) caption. Click the Action button and select Create List Item (in the List Actions group).
- In the Create Item action, click this list link.
- On the Create a New List Item dialog:
- Select Employee Status from the List: dropdown.
- Click the Employee Name (*) field and click the Modify… button
- On the Value Assignment dialog, click the Fx button for the To this value: box.
- On the Lookup for Person or Group dialog:
- Current Item for Data Source
- Employee Name for Field from Source
- Display Name for Return Field As
- Click OK
- Click OK on the Value Assignment dialog.
- Select Entry Date and Time (*) and click the Modify… button
- On the Value Assignment dialog, click the Fx button for the To this value: box.
- On the Lookup for Date and Time dialog:
- Current Item for Data Source
- Entry Date and Time for Field from Source
- Click OK
- Click OK on the Value Assignment dialog.
- Select Comment and click the Modify… button.
- Click the Fx button for the To this value: box.
- On the Lookup for Single Line of Text dialog:
- Current Item for Data Source
- Comment for Field from Source
- Click OK
- Click OK on the Value Assignment dialog.
- Select In or Out (*) and click the Modify… button
- Click the Fx button for the To this value: box.
- On the Lookup for Choice dialog:
- Current Item for Data Source
- In or Out for Field from Source
- Click OK
- Click OK on the Value Assignment dialog.
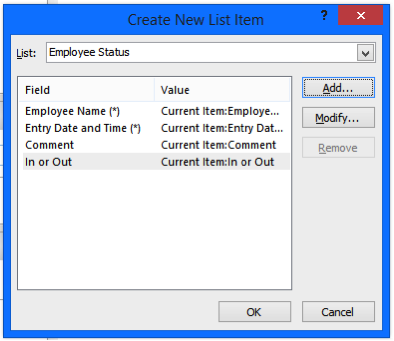
- The Create Item dialog should appear similar to the screen below:
- Click OK on the Create a New List Item dialog.
- In the Create stage, click in the Transition to Stage section.
- Click under the “Insert go-to actions with conditions for transition to the stage” caption, click the Action button in the ribbon and click Go to a stage.
- Click the a Stage link in the Go to a Stage action you inserted in the previous step. Select End Of Workflow from the dropdown.
Build out the Update stage
- In the Update stage, click under the (Start typing or use the Insert group on the Ribbon) caption. Click the Action button and select Update List Item (in the List Actions group).
- In the Update Item action, click the this list link.
- On the Update New List Item dialog,
- Select Employee Status from the List: dropdown.
- Click the Add… button.
- Select the Entry Date and Time (*) from the Set this field: dropdown
- On the Value Assignment dialog, click the Fx button for the To this value: box.
- On the Lookup for Date and Time dialog:
- Current Item for Data Source
- Entry Date and Time for Field from Source
- Click OK
- Click OK on the Value Assignment dialog.
- On the Create New List Item dialog, click the Add… button.
- On the Value Assignment dialog, choose Comment from the Set this field dropdown.
- Click the Fx button for the To this value: box.
- On the Single line of Text dialog:
- Current Item for Data Source
- Comment for Field from Source
- Click OK
- Click OK on the Value Assignment dialog.
- On the Update List Item dialog, click the Add… button.
- On the Value Assignment dialog, choose In or Out from the Set this field dropdown.
- Click the Fx button for the To this value: box.
- On the Lookup for choice dialog,
- Current Item for Data Source
- In or Out for Field from Source
- Click OK
- Click OK on the Value Assignment dialog.
- Down in the Find the List Item section of the dialog, select Employee Name from the Field: dropdown.
- Click the Fx button next to the Value: box.
- On the Lookup for Person or Group dialog,
- Current Item for Data Source
- Employee Name for Field from Source
- Display Name for Return Field As
- Click OK
- Click Yes to the “The lookup that you defined…” dialog.
- The Update Item dialog should appear similar to the screen below:

- Click OK on the Create a New List Item dialog.
- In the Update stage, click in the Transition to Stage section.
- Click under the “Insert go-to actions with conditions for transition to the stage” caption, click the Action button in the ribbon and click Go to a stage.
- Click the a Stage link in the Go to a Stage action you inserted in the previous step. Select End Of Workflow from the dropdown.
Finish Configuring the Workflow
- Click the Save button in the ribbon to save the workflow.
- Click the Publish button in the ribbon to subscribe the workflow to the Employee Status list.
- After you publish the workflow, click the Update Employee Status Workflow link in the bread crumb above the Text-based designer, as shown below:

- On the Update Employee Status Workflow page, under the Start Options section, click Start workflow automatically when an item is created.
- Click the Publish button in the ribbon again to update the changes to the workflow.
Testing the Workflow
In this section, you will test the workflow. You will create two entries in the IOBoard list. The first entry should trigger the CREATE stage in the workflow and create a list item in the Employee Status list. The second entry should trigger the UPDATE stage in the workflow and update the previously created item in the Employee Status List.
- Open Internet Explorer (or “supported” browser or your choice) and navigate to the site where you created the IOBoard and Employee Status lists in the previous article.
- Open the IOBoard site, which should be in the Recent section of the left navigation. If not, click the Gear and select Site Contents. Click the IOBoard list on this page.
- Click
 button. The Title field is optional and can be left blank. This will be removed when the InfoPath form is created for this list (next article).
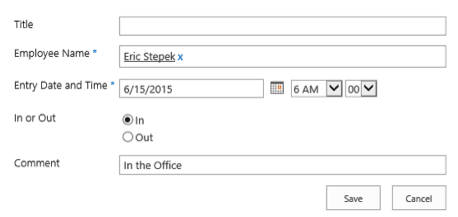
- Type your name in the Employee Name box.
- Choose an Entry Date and Time. I left the date to the current date, but changed the time portion to 6 AM; the time I came into the office (I’m a morning person…).
- Leave In or Out to In.
- Type In the Office for the Comment.
- Click the Save button.
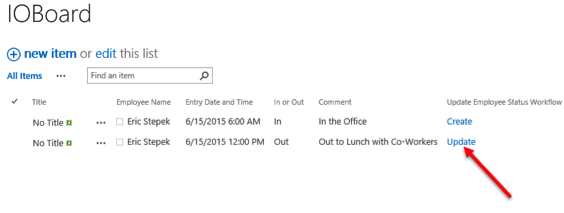
- The workflow was configured to run when a new item is created. The item for the above entry should show Create in the Update Employee Status Workflow column, which is added to the default view automatically when a workflow is kicked off.

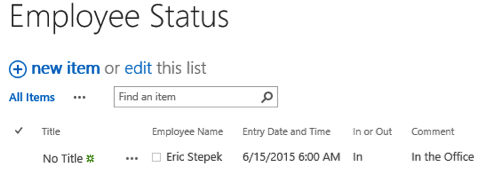
- In a new IE tab, navigate to the Employee Status list. You should see one entry for your name in the list. My entry is shown below. This was created by the workflow.
- Let’s test the Update function of the workflow. Switch back to the IOBoard list and let’s create an Out item for Lunch.
- Click button. Remember, the Title field is optional and can be left blank.
- Type your name in the Employee Name box.
- Choose an Entry Date and Time. I left the date to the current date, but changed the time portion to 12 PM.
- Set In or Out to Out.
- Type Out to Lunch with Co-Workers for the Comment.
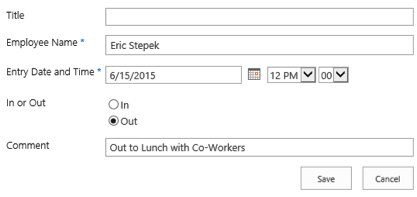
- Click the Save button.
- After a few seconds, you should get Update in the Update Employee Status Workflow column for the new Out entry.
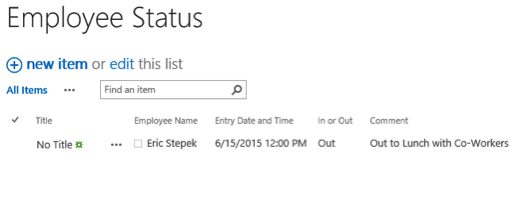
- Switch over to the tab you opened for the Employee Status list. The information for your name should be updated to reflect the Out entry created in the above steps.
The Employee Status list should only have one (1) entry per unique person. If the workflow does not find a corresponding entry in the Employee Status list for the person’s name, the workflow will create an entry. If the workflow finds an existing Employee Status entry for the person, the workflow will update the existing entry with the information submitted in the IOBoard list.
Having the ability to lookup information in other lists is an advanced function of SharePoint 2013 workflows, and something I use on a daily basis.
In the next and final article in the series, I will show you how to create an InfoPath form for the IOBoard list and add it to a SharePoint page.
Until next time, Happy SharePoint’ing.
Proceed to Part III.
Or go back and check out Part I.
Author: Eric Stepek, one of Accelebrate’s SharePoint instructors
In-Depth SharePoint Training
For in-depth SharePoint training, click here to view all of Accelebrate's SharePoint training courses for you and your staff.
Request Pricing
|

