Creating the Employee Timesheet Form in SharePoint

We offer private, customized training for 3 or more people at your site or online.

In the previous article, you added the Timesheet content type to the Employee Timesheet list. In this final article of this series, I will walk you through creating an InfoPath front end for the Timesheet list and show you how configure validation and formatting rules.

First, I will use InfoPath 2013 Designer to connect to the Employee Timesheet list and create the initial shell of the Employee Timesheet form.

  1. Open InfoPath 2013 Designer (NOT Filler).

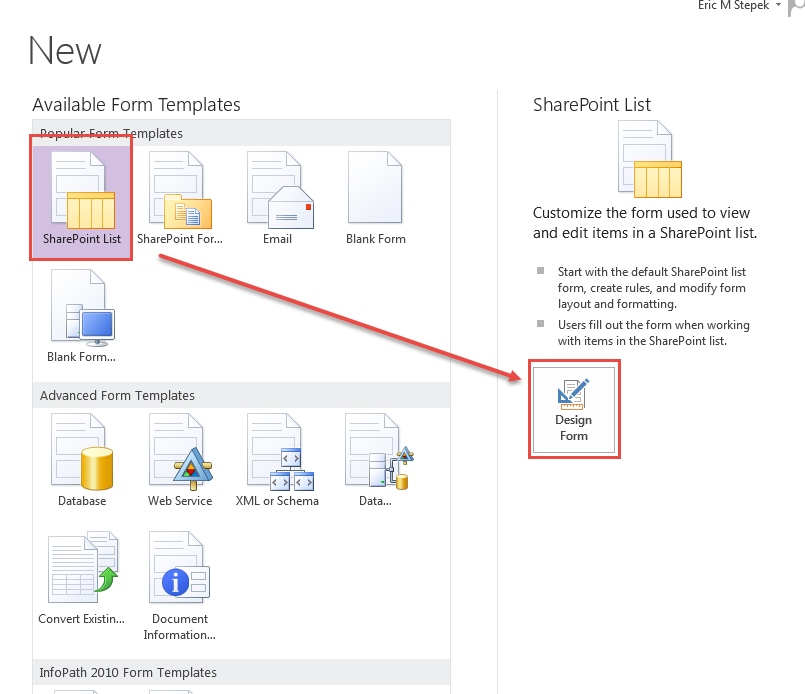
  2. On the New screen in InfoPath designer, click SharePoint List from the Available Form Templates list, then click Design Form in the right pane.

    step 2

  3. You will need the Internet Explorer URL to your test site (or the location at which you created the Employee Timesheet list).

  4. On the Data Connection Wizard screen, use the site URL from the previous step and paste it into the Enter the location of the SharePoint site: box. Click Next.

    step 4

  5. If prompted for username and password, type that information and click OK.

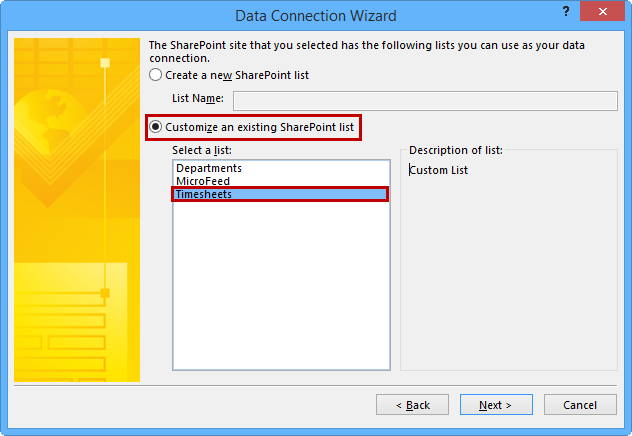
  6. Select Customize an existing SharePoint list, and then from the Select a list: box, choose Timesheets. Click Next.

    step 6

  7. In the Select a content type: box, click Timesheet.

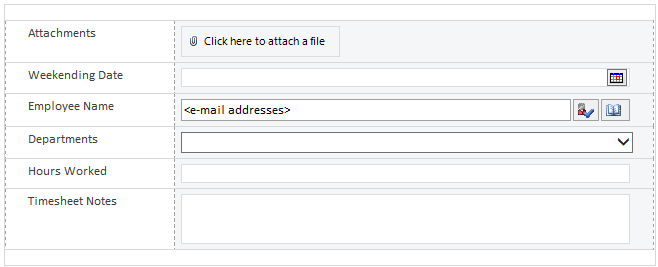
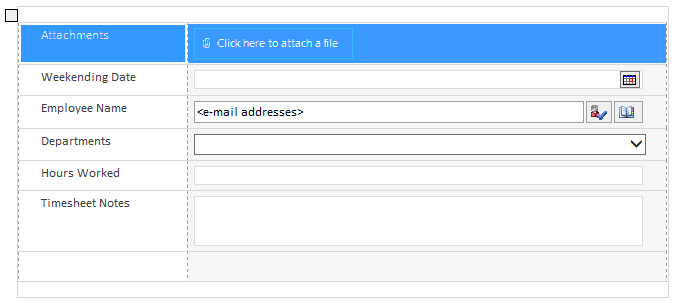
  8. Click Finish to complete the Data Connection Wizard. InfoPath Designer will open, showing you the initial form.

    step 8

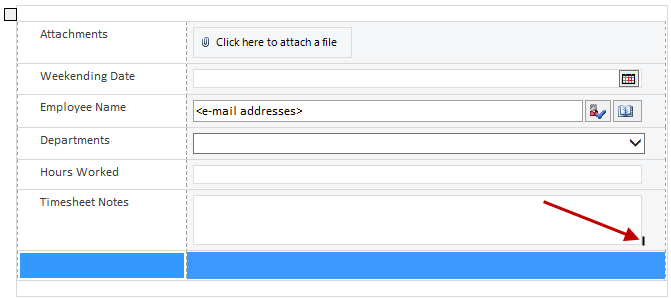
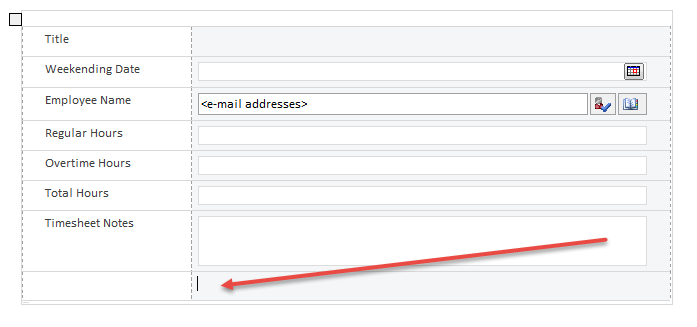
  9. Put the mouse cursor so that it is just to the right of the Timesheet Notes text box in the right hand column, then press the TAB key to append a new row to the table under the Timesheet Notes row.

    step 9

  10. Select the entire Attachments row and delete it from the table by pressing the Backspace key.

    step 10

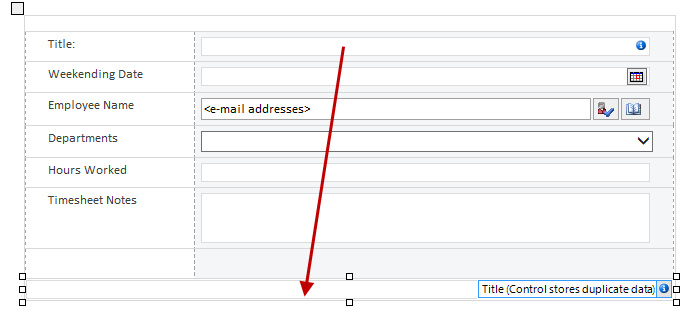
  11. Click the Title textbox and drag it to the empty space below the last row in the form table

    step 11

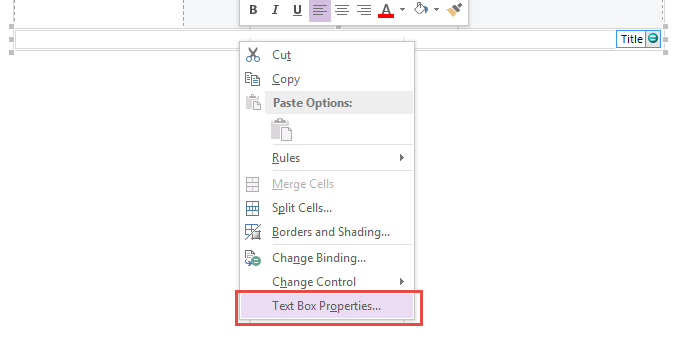
  12. Right-click the Title textbox you just moved and select Text Box Properties from the dropdown.

    step 12

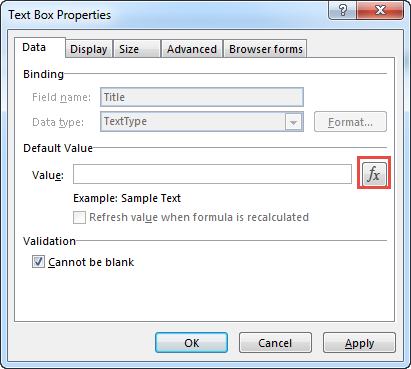
  13. On the Display tab of the Text Box Properties dialog, click the button to the right of the Value: textbox.

    step 13

  14. In the Formula box, do the following:
    1. Type concat(substring(translate(now(), ":-T", ""), 6)
    2. Type ,"-",
    3. Click the Insert Field or Group… button and click the Show Advanced View link right above the Filter Data… button.
    4. Click the + sign next to the Employee Name field, then click the + sign next to the pcPerson field.
    5. Select DisplayName and click OK.
    6. Type ) to complete the concat function..

      The completed formula should be: concat(substring(translate(now(), ":-T", ""), 6),"-",DisplayName)

    7. Click OK to save the formula.

  15. In the Text Box Properties dialog, click the Display tab.

  16. Check the Read-only box.

  17. On the Text Box Properties dialog, click the Size tab.

  18. On the Size tab, do the following:

    1. Height: change the value from auto to 1 and select px from the dropdown to the right of the height box.

      step 18a

    2. Change the Width: value from 100 to 1.

      step 18b

    3. Click the Apply button, then click OK.

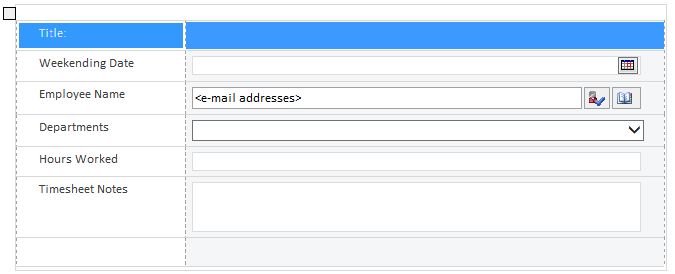
    4. The Title field should shrink to a very small size, as shown below:

      step 18d

  19. Back on the InfoPath form, select the entire Title row at the top of the form and press the Backspace button to delete it.

    step 19

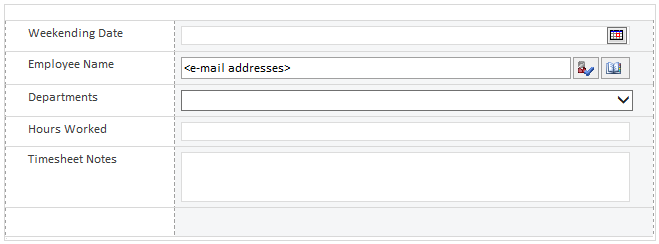
    At this point, the InfoPath form should look like the image shown below.

    step 19

    Now, you will add a Submit button control, which will be used to create a new item in the SharePoint Employee Timesheet list.

  20. In the empty row you added under the Timesheet Notes row, click in the right column (which is shaded gray).

    step 20

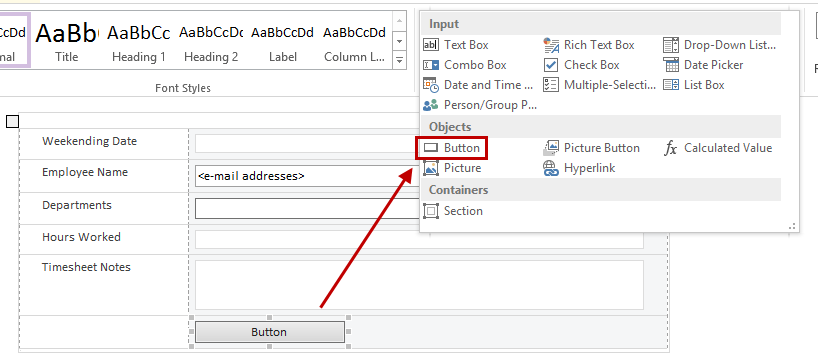
  21. In the Controls section of the ribbon, click the More arrow (caret with a line above it, just to the right of the Multiple-Selection… control) to expand the control section.

    step 21

    Click Button.

    step 21

  22. Click the Button control you just added, then click the purple Control Tools | Properties tab in the ribbon.

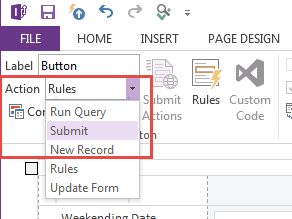
  23. On the right-side of the ribbon, in the Action dropdown, select Submit.

    step 23

  24. Click the Save button in the upper left corner of the InfoPath Designer window (right above the File tab). In the Save As dialog that appears, name the  fileTemplate.xsn, select the Documents folder, and click the Save button.

    The form is a bit large for our purposes, so in the next series of steps, you will resize the data fields on the form.

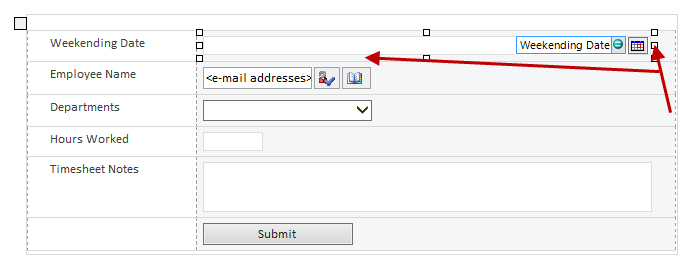
  25. For each data field on the right side of the form (in the gray area of the form), click it and use the mouse to grab the right control hook to shrink the control down to a reasonable size, as I've show below:

    step 25

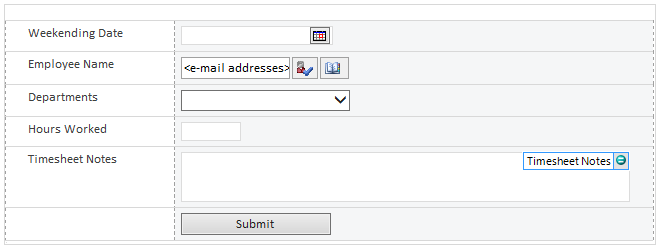
  26. Resize the controls to your liking or as I have displayed below:

    step 26

  27. Click the Save button in the upper left corner of the InfoPath Designer window (right above the File tab).

  28. Let's add a title and color to our form. Click the Page Design tab in the ribbon. On the Page Design tab, expand the theme selection by clicking the control on the right of the Themes list. In the Playground group of themes, select Playground-Cay (or whichever theme you like).

    step 28

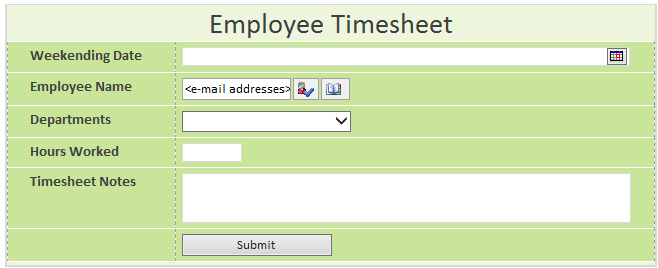
  29. In the row above Weekending Date, type Employee Timesheet. Click the Home tab in the ribbon and select the Employee Timesheet text. In the Font Styles section of the Home tab, select the Title style. Click the Center Text button to center the text on the form.

    step 29

  30. Click the Save button in the upper left corner of the InfoPath Designer window (right above the File tab).

    At this point, you should have a timesheet form that looks similar to the picture below. Now it's time to add some rules to validate and format the Hours Worked field.

    step 30

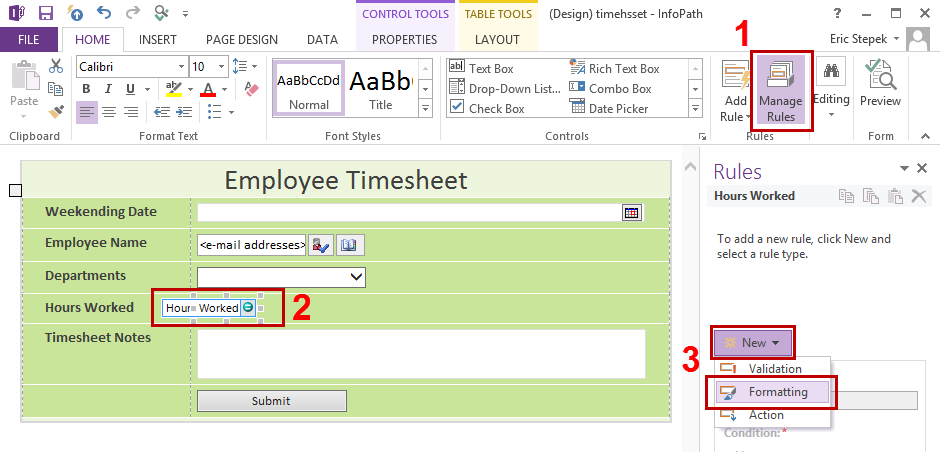
  31. On the Home tab in the ribbon, click the Manage Rules button (located on the right side of the ribbon). The Rules pane will appear on the right of the design screen. Click the Hours Worked textbox and then click New in the Rules pane, selecting Formatting from the new rule dropdown.

    step 31

  32. In the Details for: box, type Hours less than 40 as the rule name.

    step 32

  33. Under the Condition* label, click the None link to add a formatting condition. On the Condition dialog, make sure Hours worked is in the first box, then choose Is Less Than from the second dropdown. Next, click the third dropdown, select Type a number, and type 40 in the box. Click OK to save the condition.

    step 33

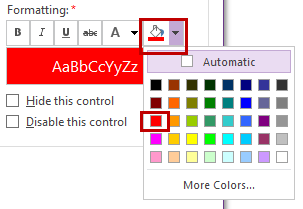
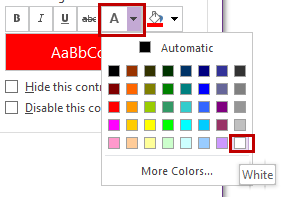
  34. Down in the Formatting:* section, choose Red for the fill color. Choose White for the font color.

    step 34   step 34

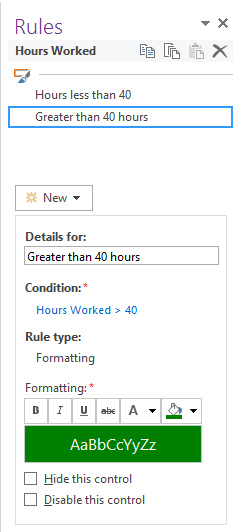
  35. Repeat Steps 31-34, using the table below for information to complete the step.

  36. Rule Type

    Formatting

    Rule Name

    Greater than 40 Hours

    Condition

    Hours Worked | Greater Than | 40

    Formatting Fill Color

    Green

    Formatting Font Color

    White


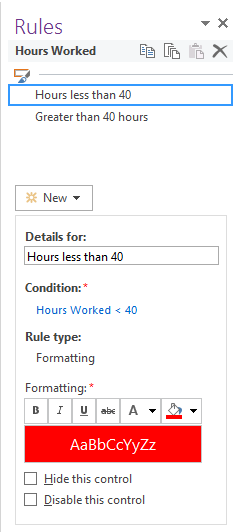
  37. Your Rules set should look as follows:


    step 36 step 36

  38. Click the Save button in the upper left corner of the InfoPath Designer window (right above the File tab).

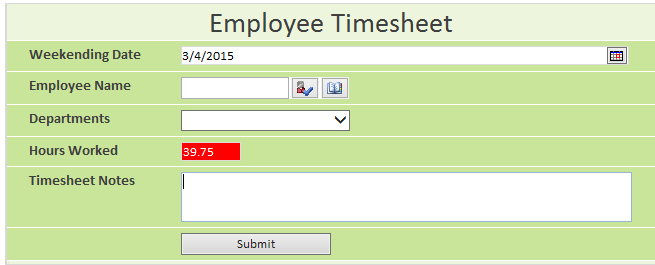
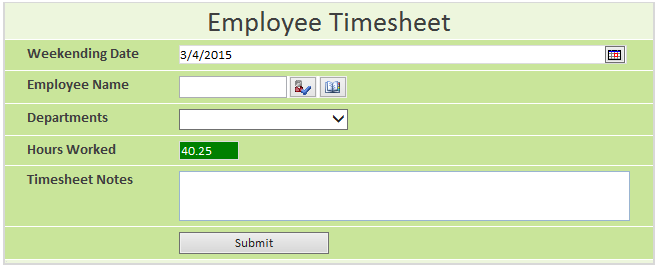
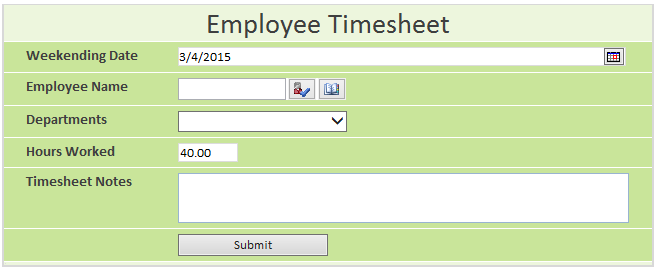
  39. Let's test the form before publishing it to the SharePoint server. Press the F5 key to enter Preview Mode. In the Hours Worked field, type 39.75 and press the Tab key. The Hours Worked field should turn Red. Go back into the Hours Worked field, type 40.25. The Hours Worked field should turn Green. Finally, test with 40 hours. The 40 hours entry should cause the box to return to white fill with black text.

    39.75 Hours:
    step 38

    40.25 Hours:
    step 38

    40.00 Hours:
    step 38

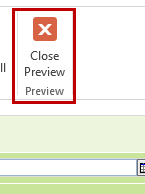
  40. If your tests are successful, as show above, you are ready to publish the employee timesheet to the SharePoint site. Click the Close Preview button on the right side of the ribbon to return to Design mode.

    step 39

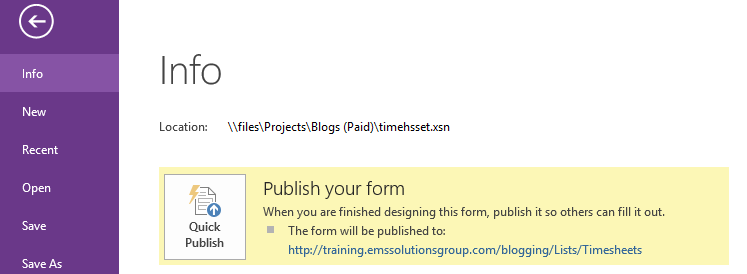
  41. Click the File tab on the ribbon and click the Quick Publish button.

    step 40

    When you receive a message saying Your form template was published successfully, click OK to dismiss the dialog.

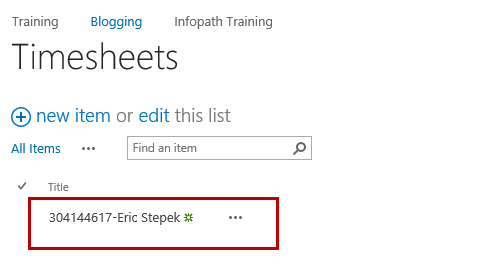
  42. If you open the Timesheets list you configured in the previous article and click the New Item button, your Timesheet InfoPath form should display. Test it out!

    step 41
    step 41

This is the last article in this series. I hope you enjoyed working along with the article series as much as I enjoyed writing them. Until next time, Happy SharePoint'ing!


Author: Eric Stepek, one of Accelebrate’s SharePoint instructors

Previous: Creating the Timesheet List and Assigning the Timesheet Content Type in SharePoint


In-Depth SharePoint Training

For in-depth SharePoint training, click here to view all of Accelebrate's SharePoint training courses for you and your staff.

Request Pricing 

Learn faster

Our live, instructor-led lectures are far more effective than pre-recorded classes

Satisfaction guarantee

If your team is not 100% satisfied with your training, we do what's necessary to make it right

Learn online from anywhere

Whether you are at home or in the office, we make learning interactive and engaging

Multiple Payment Options

We accept check, ACH/EFT, major credit cards, and most purchase orders


Recent Training Locations

Alabama

Birmingham

Huntsville

Montgomery

Alaska

Anchorage

Arizona

Phoenix

Tucson

Arkansas

Fayetteville

Little Rock

California

Los Angeles

Oakland

Orange County

Sacramento

San Diego

San Francisco

San Jose

Colorado

Boulder

Colorado Springs

Denver

Connecticut

Hartford

DC

Washington

Florida

Fort Lauderdale

Jacksonville

Miami

Orlando

Tampa

Georgia

Atlanta

Augusta

Savannah

Hawaii

Honolulu

Idaho

Boise

Illinois

Chicago

Indiana

Indianapolis

Iowa

Cedar Rapids

Des Moines

Kansas

Wichita

Kentucky

Lexington

Louisville

Louisiana

New Orleans

Maine

Portland

Maryland

Annapolis

Baltimore

Frederick

Hagerstown

Massachusetts

Boston

Cambridge

Springfield

Michigan

Ann Arbor

Detroit

Grand Rapids

Minnesota

Minneapolis

Saint Paul

Mississippi

Jackson

Missouri

Kansas City

St. Louis

Nebraska

Lincoln

Omaha

Nevada

Las Vegas

Reno

New Jersey

Princeton

New Mexico

Albuquerque

New York

Albany

Buffalo

New York City

White Plains

North Carolina

Charlotte

Durham

Raleigh

Ohio

Akron

Canton

Cincinnati

Cleveland

Columbus

Dayton

Oklahoma

Oklahoma City

Tulsa

Oregon

Portland

Pennsylvania

Philadelphia

Pittsburgh

Rhode Island

Providence

South Carolina

Charleston

Columbia

Greenville

Tennessee

Knoxville

Memphis

Nashville

Texas

Austin

Dallas

El Paso

Houston

San Antonio

Utah

Salt Lake City

Virginia

Alexandria

Arlington

Norfolk

Richmond

Washington

Seattle

Tacoma

West Virginia

Charleston

Wisconsin

Madison

Milwaukee

Alberta

Calgary

Edmonton

British Columbia

Vancouver

Manitoba

Winnipeg

Nova Scotia

Halifax

Ontario

Ottawa

Toronto

Quebec

Montreal

Puerto Rico

San Juan