We offer private, customized training for 3 or more people at your site or online.
Azure DevOps is a powerful set of tools that provides developers and teams with everything they need to plan, build, test, and deploy software quickly and efficiently. It enables collaboration and continuous improvement with features for source control, continuous integration/deployment (CI/CD), test management, Agile planning, and more, making it a popular choice for modern software development. With Azure DevOps, organizations can streamline their workflows, increase transparency, and achieve better results, all while minimizing costs and reducing time-to-market.
One of our seasoned Azure DevOps experts has compiled step-by-step answers to some of the most frequently asked questions about how to implement Azure DevOps. For hands-on, instructor-led training on these topics and more for your team of 3 or more, browse our Azure training courses.
- How do I get started with Azure DevOps?
- How do I create a project in Azure DevOps?
- How do I add team members to a project in Azure DevOps?
- How do I add source code to Azure DevOps?
- How do I create a build pipeline in Azure DevOps?
- How do I deploy an application to Azure using Azure DevOps?
- How do I monitor an application in Azure using Azure DevOps?
1. How do I get started with Azure DevOps?
- Create a Microsoft account if you do not yet have one. Hint: You can create a new Microsoft with Outlook.com so you do not conflict with other Microsoft services associated with your account. Using Outlook.com will give you an email account that can be used to verify Microsoft services as your sign up for them.
- Go to the Azure DevOps website and click the "Start free" button.
- Sign in with your Microsoft account, either your existing Microsoft account or the Microsoft account you created in the first step.
- A default organization will be created for you. Specify a name for the project, select the visibility, select your country/region, then fill out the human validation form.
- Click the "Continue" button.
2. How do I create a project in Azure DevOps?
- Sign into your account at https://azure.microsoft.com/en-us/products/devops.
- Once you're signed in, you'll be taken to the dashboard where you can manage your existing projects or create new ones.
- Click the "+ New project" button in the top-right corner of the dashboard.
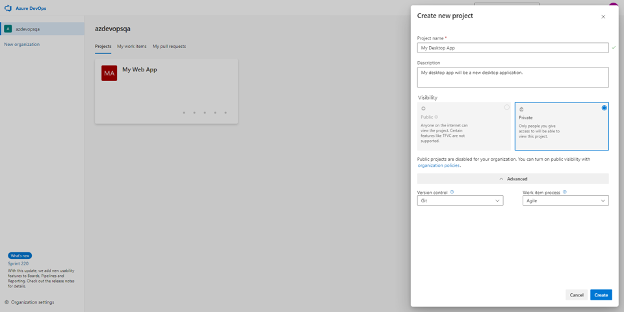
- Configure the project settings, including naming the project, providing a description, and setting the visibility.
- To configure advanced options such as source control and work item process, click the "Advanced" link. Select the desired source control and work item process.
- Click the "Create" button.
3. How do I add team members to a project in Azure DevOps?
- Go to the project settings page.
- Click on the "Teams" tab under "General".
- Click on the only team in the list. Then click the "Add" button in the top-right corner of the member's table.
- Enter the email address of the person you want to add, then click the "Save" button.

4. How do I add source code to Azure DevOps?
- Go to the "Repos" tab.
- Copy the command from the "Push an existing repository" from command line.
- Open a terminal window and change to your project folder. If the project is not initialized with Git, then initialize it with the command: "git init".
- Run the "git remote add" command copied and pasted from the Azure DevOps portal.
- If your project does not have any commits, create a new commit with the following commands: "git add -A; git commit -m "initial commit".

- Push your local commits to the remote: "git push -u origin main".
- To complete the push, you may need to login. Complete the login process if needed.
- Refresh the Azure DevOps "Repos" tab page. The push code will be displayed.
5. How do I create a build pipeline in Azure DevOps?
- Go to the "Pipelines" tab.
- Click on the "Create Pipeline" button.
- On the "Where is your code?" step, click on "Azure Repos Git."
- Select the code repository where the code is stored.
- On the "Configure your pipeline" step, select the configuration that best matches your project type.
- Click on the "Save and run" button.
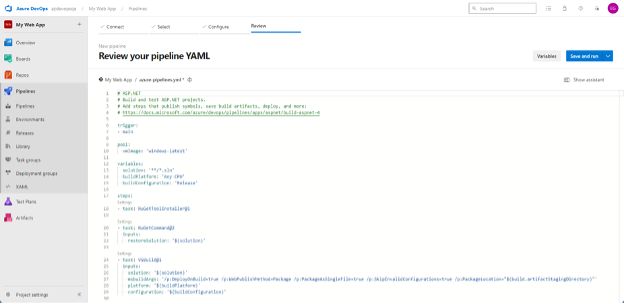
- Review the commit message and click the "Save and run" button in the bottom-right corner.
- The pipeline should run and eventually successfully complete (this can take 5 -10 mins).
- If your account does not include paid build agents, you can request a free build agent at https://aka.ms/azpipelines-parallelism-request. The approval for the request can take several days. Once you have a paid or approved free build agent, run the pipeline again.
6. How do I deploy an application to Azure using Azure DevOps?
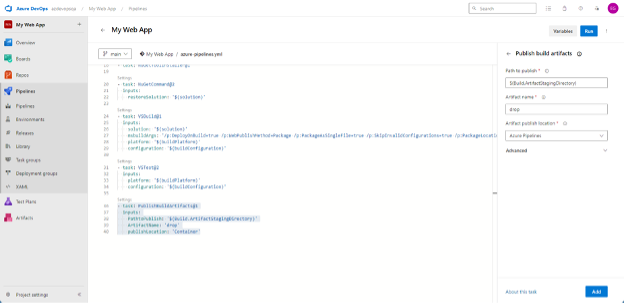
- Configure the Build Pipeline (sometimes referred as simply a Pipeline) to publish the build artifact. The published build artifact will be deployed by a Release Pipeline.
- Under the "Pipelines" tab, click the "Releases" sub-tab.
- Click the "New pipeline" button.
- Select the template that matches your kind of application.
- Click the "X" on the "Stage" dialog.
- In the diagram, click the "Add an artifact" box.
- Select the "Build" Source Type, select the desired project, and select the desired build pipeline. Then, click "Add."
- Click the lightning bolt icon in the upper right corner of the box in the "Artifacts" section of the release definition diagram. Enable the "Continuous deployment trigger." Click the "Continuous Deployment" panel.
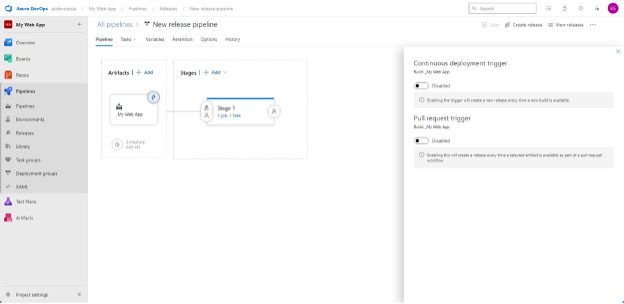
- In the diagram, click "1 job, 1 task" within "Stage 1."
- Select the Azure Subscription associated with your account. If you do not have an Azure Subscription, you will need to create one at https://portal.azure.com.
- The application is being deployed to an Azure App Service. The App Service to deploy the application needs to be selected. If the desired App Service does not exist in Azure, then it will need to be created before proceeding. Deploying to Azure from Azure DevOps requires the Azure services to be created ahead of time.
- Then click "Save." Accept the default for the folder. Specify a comment if you like. Then, click "Ok."
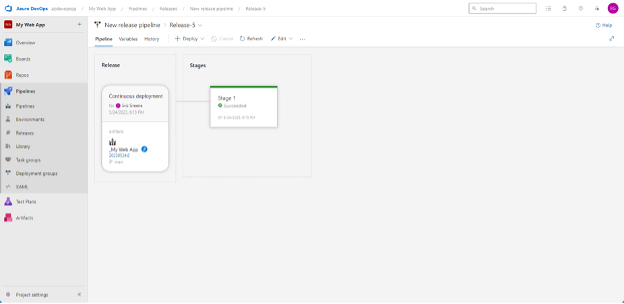
- Run the Build Pipeline, when it completes, it will trigger the Release Pipeline.
- To view the status of the release, click the release link displayed.
- The application will be available.
7. How do I monitor an application in Azure using Azure DevOps?
- Create a new Release Pipeline using the "Azure App Service deployment with continuous monitoring" template.
- Configure the build artifact from the desired Build Pipeline and optionally enable Continuous Integration.
- Configure "Stage 1" selecting the appropriate resources from Azure.
- Click on the "lightning bolt icon" on the left-side of the "Stage 1" box in the Release Pipeline diagram. Then enable pre-deployment Gates. Add the "Query Azure Monitor alerts."
- Click on the "person icon" on the right-side of the "Stage 1" box in the Release Pipeline diagram. Then disable post deployment "Gates."
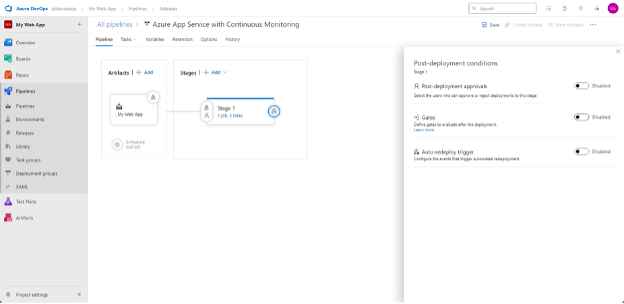
- Save the Release Pipeline and Create a Release.
- View the release status, and mouse over the "Stage 1" box, and click the "Logs" button.
- Review the Query Azure Monitor alerts.
Contact Us for a quote or more information on our in-person or online, live Azure training. Any course can be customized for your team.
Written by Eric Greene, a professional software developer specializing in DevOps, Azure, C#, Python, HTML, CSS, and JavaScript/TypeScript technologies. He has been developing software and delivering training classes for 26 years. He holds many Microsoft certifications, including DevOps Engineer Expert, Azure Administrator Associate, and Azure Developer Associate.


